How to Use Webex Calling for Chrome
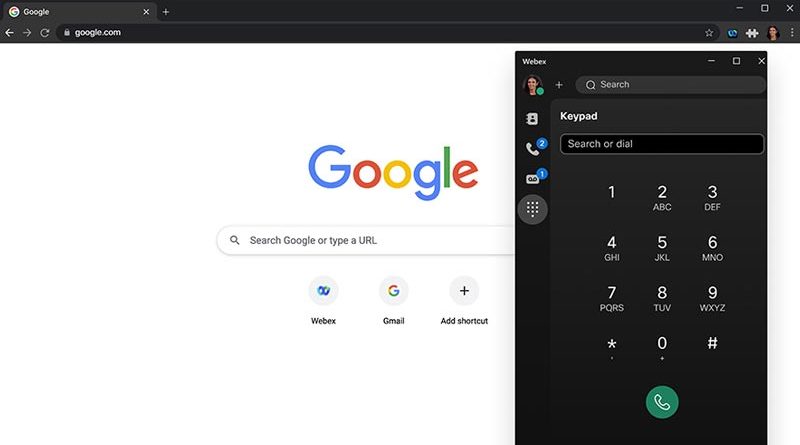
Webex Calling for Chrome allows you to place and receive calls in the Google Chrome browser without downloading a separate application.
The extension mimics a desktop application and features a keypad, call history, contact list and voicemail messages.
It also allows you to place a call by clicking a phone number on any web page using Chrome.
How to Add Webex Calling for Chrome
Before you begin, you must use Chrome browser version 104 or later. To add Webex Calling for Chrome as an extension, follow these steps:
- Navigate to the Google Chrome web store and search for Webex Calling for Chrome.
- Click Add to Chrome.
- Click Add extension.
- (Optional) Pin the extension to the browser tab.
How to Sign in to Webex Calling
Follow the steps to sign in:
- Click the
 icon on your Chrome browser.
 - Enter your email address. Click Next.
- Enter your account password. Click Sign in. Once you sign in to Webex Calling for Chrome, you can see your number in the footer of the client.
How to Make a Call
There are several ways for you to call using Webex Calling for Chrome.
To call someone, click one of the following Menu options:
| MENU | WHAT TO DO |
|---|---|
| Keypad | – Select the – Enter the extension number or the Direct Inward Dial (DID) number of the person you wish to call. – Click the |
| Calling | – Click the – Hover over the contact that you want to call and click the |
| Click-to-call | – You can place a quick call to a phone number that is displayed on your web page. – Hover over a phone number with E.164 format on Google workspace application and/or web page. – Click the |
How to Receive a Call
You receive a browser notification on your desktop when there is an incoming call. To receive notifications for an incoming call, make sure that you enable notifications in your operating system and Chrome browser.
To enable notifications in your Chrome browser:
- Navigate to Settings>Privacy and security>Site settings>Notifications. Set Default behaviorto Sites can ask to send notifications. Add webex.com under Allowed to send notifications within Customized behaviors.
To enable notifications for the operating system on your desktop:
- Windows—Navigate to Settings>Notifications. Make sure that all the required permissions in the Notifications are provided. Mark Google Chromeas On under Notifications from apps and other senders.
- Mac—Navigate to System Preferences>Notifications & Focus. In the application list, click Google Chrome. Toggle the Allow Notificationsslider to enabled and select the type of notification Chrome can send.
- ChromeOS—Navigate to the notification area in your system tray or taskbar. Click the clock icon to open a menu. Make sure that the icon Notificationsis set to On, all apps. Click Notifications to open the notification settings. Check the check box against Chrome Goodies in Allow notifications from the following.
If you have not allowed media permissions for web.webex.com, you will not hear the audio notification for a call.
Follow these steps to answer a call using Webex Calling for Chrome:
- Click the browser notification on your desktop to restore the Webex Calling for Chrome client.

- Click
 to answer the call.
 - The active call screen displays. Click the red X to end the call.

Why You Would Use Webex Calling for Chrome
Webex Calling for Chrome is for those users who do not want to use the desktop application or want to have another option in addition to the app.
Additionally, if you turn on sync when you sign into your Google account on Chrome, the extension will be available on your browser regardless of what computer you use. There is no need to add the extension on each computer you use.
VoIP Phone System Services in West Michigan
Want to learn more about Webex Calling for Chrome? Contact Hungerford Technologies to see how we can help keep your business running smoothly while increasing productivity, security and profitability.


